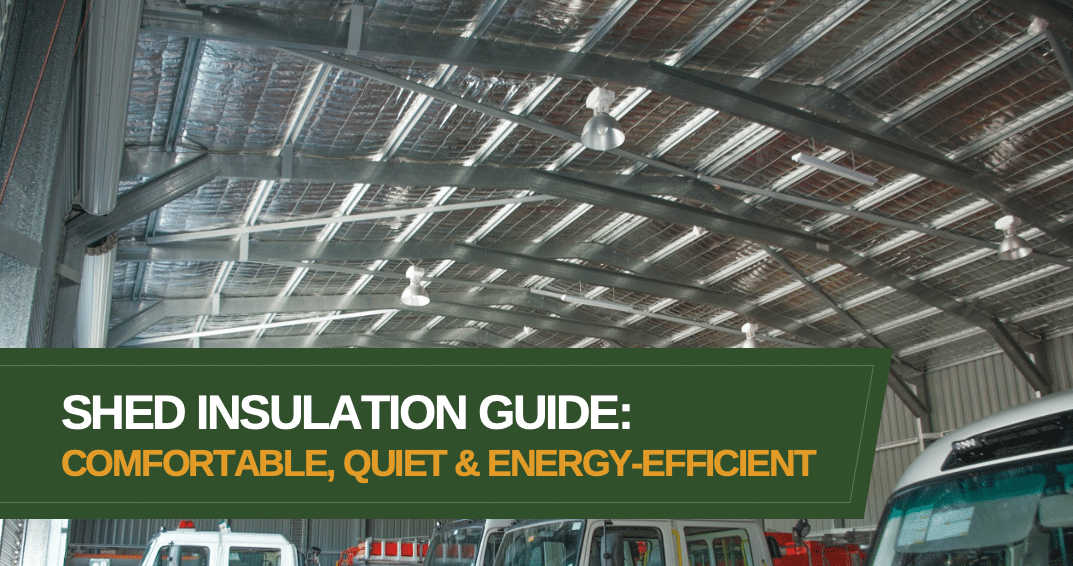
In this comprehensive shed insulation guide, we will explore everything you need to know about creating a comfortable and energy-efficient space that protects your belongings.
Importance of Shed Insulation
A properly insulated shed offers numerous benefits beyond just comfort. One of the primary advantages is improved energy efficiency, which can lead to significant cost savings in the long run. When your shed is well-insulated, it helps to regulate the temperature inside, reducing the need for additional heating or cooling devices. This can translate into lower energy bills and a reduced carbon footprint. Certain types of insulation will also reduce outside noise, which is a significant, but often overlooked benefit.
Additionally, insulation serves as a protective layer for your stored items. Extreme temperatures can damage sensitive items such as electronics, tools, or prized possessions. Moisture and condensation can lead to mould or rust, compromising the integrity of your belongings. By insulating your shed, you create a stable environment that safeguards your items from these potential hazards.
Common Problems with Uninsulated Sheds
Before diving into the specifics of shed insulation, it’s essential to understand the common challenges associated with un-insulated sheds. These problems can affect the comfort, durability, and usability of your shed.
Firstly, temperature extremes are a prevalent issue in sheds lacking insulation. During the hot Australian summer, the interior can turn into a sweltering oven, making it unbearable to spend time inside. Equally, in freezing winters, the lack of insulation allows cold air to seep in, making it impossible to utilise the space effectively.
Moisture and condensation are another set of problems that plague un-insulated sheds. Without proper insulation, moisture can accumulate, leading to mould growth, and damage to stored items. This damp environment also attracts pests, such as rodents or insects, further compromising the integrity of your shed and its contents.
Assessing Your Shed for Insulation
Before embarking on the insulation journey, it’s crucial to consider your shed’s size, layout, and the climate of your location. These factors play a significant role in determining the type of insulation that will work best for your shed.
Additionally, identify any problem areas, such as gaps, cracks, or poorly sealed windows and doors, as these will require special attention during the insulation process.
Steel sheds conduct heat and cold more readily, so choosing an insulation material with a high R-value is essential. Cold climates require insulation that can withstand cooler temperatures, while hot climates necessitate materials that can effectively reflect heat. Humid climates require insulation that not only provides thermal resistance but also prevents moisture buildup.
In the next section of this shed insulation guide, we will explore the different types of shed insulation available and discuss their installation processes, pros, and cons.
Expert Custom Shed Advice
While this guide is intended as an introduction to insulating your shed, there is no substitute for experience and expertise. To speak to an expert Shedologist™ about your specific project and requirements, schedule a Free Shed Design & Quote Session.
Shed Size and Layout
Start by measuring the square meterage of your shed. This will give you an idea of how much insulation material you’ll need. Measure the length and width of each wall and ceiling. Add up these measurements to determine the total square meterage.
While measuring, take note of any irregularities or unique features in your shed’s layout. Are there areas that are particularly exposed to the elements? Are there gaps or cracks in the walls or foundation? Identifying these problem areas will help you plan for insulation placement and ensure a more effective insulation solution.
Types of Shed Insulation
When it comes to insulating your shed, there are only three types offered in the Australian shed industry:
- A single thickness silver foil (sarking).
- A bubble wrap style with a silver foil attached either side.
- A single thickness silver foil with fibreglass blanket attached.
Sarking Style Insulation
The sarking style insulation is more of a waterproofing barrier with little insulation properties. It is also difficult to get to look good after installation due to sagging.
Despite its popularity with DIY shed builders, our suppliers have outright told us that this is a waste of money for applications in sheds. So it’s not something we recommend.
Installation Techniques
Sarking can be installed by stapling it to the walls, ceiling, or roof of the shed. It is important to leave an air gap between the foil and the surface being insulated to allow for proper reflection of heat. The foil should be installed with the reflective side facing the interior of the shed.
Benefits and Limitations
One of the main advantages of sarking is it is cheap and relatively easy to install and does not require special tools or equipment. Reflective foil insulation is lightweight and flexible, making it suitable for various shed construction materials.
But as mentioned already, it offers very little insulation properties and is not something we recommend. Additionally, it does not provide soundproofing qualities like other insulation materials.
Bubble Wrap Style
Bubble wrap style insulation can work well if properly installed for temperature insulation. It is popular in the industry because it is easy to install.
Benefits and Limitations
This can be a cost-effective solution if installed properly.
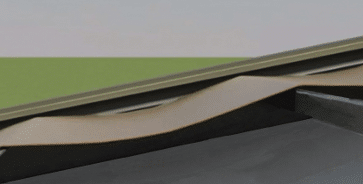
The problem is for it to work properly it needs to be installed with a sag between roof purlins/supports, depending on the brand anywhere from 40mm to 70mm (see picture below).

The insulation works due the air gap between the insulation and the roof sheet.
If there is no air gap, it is not much better than sarking. That can be a problem since many installers will make it too tight when fitting it. While that might look better, it eliminates the temperature benefits and also provides zero noise insulation (i.e. when raining).
Fibreglass Blanket Style Insulation (Recommended)
This brings us to the blanket style fibreglass insulation, which is what we recommend and are happy to supply.
While it’s bulkier, a bit harder to install and needs the support wire for best performance, it is the best solution for temperature regulation and noise reduction. And since it can be installed hard against the roof sheet, it looks good when finished.
Most people start exploring insulation with temperature in mind. However, the noise reduction benefits should not be overlooked. Without insulation it can get very noisy inside a shed. In heavy rain the sound can almost be deafening. With the blanket insulation you can still hold a conversation or listen to the radio or music.
Surprisingly it is often cheaper than the bubble wrap style. And don’t worry about fibreglass fibres falling in the shed, the silver foil underneath overlaps a good 100mm, sealing the blanket above it.
Installation Process
To install fibreglass insulation in your shed, start by wearing protective clothing, gloves, and a mask to avoid skin irritation and respiratory issues. Measure the length and width of each wall, and cut the insulation batts or rolls accordingly. Fit the insulation snugly between the wall studs, ensuring there are no gaps or spaces.
Insulating Your Shed
Once you have chosen the appropriate insulation material for your shed, it’s time to embark on the insulation installation process. This section will guide you through the steps of insulating your shed, from preparing the space to sealing air leaks and insulating the roof.
Preparing for Insulation Installation
Before you begin the insulation installation, it is essential to prepare the shed properly. Start by clearing out any items or clutter that may hinder the insulation process. This will ensure that you have a clear and accessible workspace.
Inspect the shed for any existing damage, such as gaps around windows and doors. Addressing these issues before insulating will help create a more effective and long-lasting insulation solution. Repair any damaged areas and seal any gaps or cracks with caulk.
Installing Insulation
The process of installing insulation will vary depending on the type of insulation material you have chosen.
Insulating the Shed Roof
The roof is an important area to insulate as it can be a significant source of heat gain or loss. Depending on the type of insulation material you have chosen, there are several options for insulating the shed roof.
For fibreglass insulation, cut the insulation batts or rolls to fit between the roof rafters. Press the insulation firmly into place, ensuring complete coverage, and fix in place with wire. Reflective foil insulation can be attached to the underside of the roof using staples or adhesive.
By properly insulating the shed and sealing air leaks, you can create a comfortable and energy-efficient space that protects your stored items. In the next section of this shed insulation guide, we will explore additional tips and considerations to help you make the most of your insulated shed.
Additional Tips and Considerations
Insulating your shed is a significant step towards creating a comfortable and energy-efficient space. However, there are additional tips and considerations to keep in mind to maximise the effectiveness of your shed insulation. In this section, we will explore ventilation and air circulation, insulating shed doors and windows, maintaining insulation efficiency, and the decision of hiring professionals versus taking a DIY approach.
Ventilation and Air Circulation
Proper ventilation is crucial for maintaining a healthy and comfortable environment inside your insulated shed. Good ventilation helps prevent the buildup of excess moisture, which can lead to mould and mildew growth. It also helps regulate temperature and improve air quality.
Consider installing vents or fans in your shed to promote air circulation. Vents allow fresh air to enter and stale air to exit, preventing the buildup of stagnant air. Fans can help improve airflow and regulate temperature, especially in the hot and humid Australian climate. Ensure that the ventilation system is properly sized and positioned to provide adequate air exchange.
Insulating Shed Doors and Windows
Shed doors and windows are common areas for air leakage and heat transfer. To enhance the insulation of these areas, consider adding weatherstripping or draft excluders to your shed doors. Weatherstripping seals gaps and cracks around the edges of the door, preventing drafts and heat loss. For windows, apply window insulation film or use caulk to seal any gaps or cracks.
Additionally, consider upgrading to insulated doors and windows if possible. Insulated doors and windows are designed to provide better thermal resistance, reducing heat transfer and air leakage. They can significantly enhance the overall insulation performance of your shed.
Maintaining Insulation Efficiency
To ensure that your shed insulation remains effective over time, regular maintenance is essential. Inspect your insulation periodically to check for any damage or signs of wear. Look for areas where insulation may have become compressed or displaced, and address any issues promptly.
If you notice any damage or deterioration, such as sagging fibreglass insulation, repair or replace the affected materials as necessary. Maintaining the integrity of your insulation will help it continue to provide optimal thermal resistance and energy efficiency.
Hiring a Professional vs. DIY Insulation
The decision to hire a professional or take a DIY approach to shed insulation depends on various factors, including your comfort level with insulation installation, the complexity of the project, and your budget.
Using a professional shed builder can ensure that the job is done correctly and efficiently. Professionals have the knowledge, experience, and specialised equipment to handle insulation installation, including addressing any unique challenges your shed may present. (We can help you find a shed builder.)
If you decide to take a DIY approach, it is crucial to educate yourself on the proper insulation techniques and safety precautions. Follow manufacturer instructions carefully and ensure that you have the necessary tools and protective gear. DIY insulation can be a cost-effective option if you are confident in your abilities and willing to invest the time and effort into the project.
Consider your budget, time constraints, and skill level when deciding whether to hire a professional or tackle the insulation installation yourself.
Conclusion: Creating a Well-Insulated Shed
By insulating your shed, you can transform it into a comfortable and energy-efficient space that protects your belongings from temperatures, noise, moisture, and pests.
Throughout this shed insulation guide, we explored the importance of shed insulation, the common problems associated with un-insulated sheds, and the factors to consider when assessing your shed for insulation. We discussed the different types of shed insulation, including silver foil sarking, bubble wrap style silver foil, and fibreglass blanket insulation.
Each type has its own installation process, benefits, and limitations, allowing you to choose the most suitable option for your shed’s needs. For most medium-to-large shed projects, we recommend fibreglass blanket insulation.
We also delved into the steps involved in insulating your shed, from preparing the space for insulation installation to sealing air leaks and insulating the roof. Proper preparation, installation, and sealing techniques are essential for maximising the effectiveness of your shed insulation.
Additionally, we explored additional tips and considerations, such as the importance of ventilation and air circulation, insulating shed doors and windows, maintaining insulation efficiency, and the decision of hiring professionals versus taking a DIY approach. These factors contribute to the overall success and longevity of your shed insulation.
Remember, a well-insulated shed not only provides comfort while using your shed, protection for your stored items and helps to reduce energy consumption and lower utility costs. It is an investment that pays off in the long run.
So, whether you use your shed as a workshop, storage space, or a cosy retreat, insulating it will enhance its functionality and make it a more enjoyable and valuable part of your property.
As always, if you would like any assistance designing your custom shed, we invite you to schedule a FREE Shed Design & Quote Session with an expert Shedologist™.


